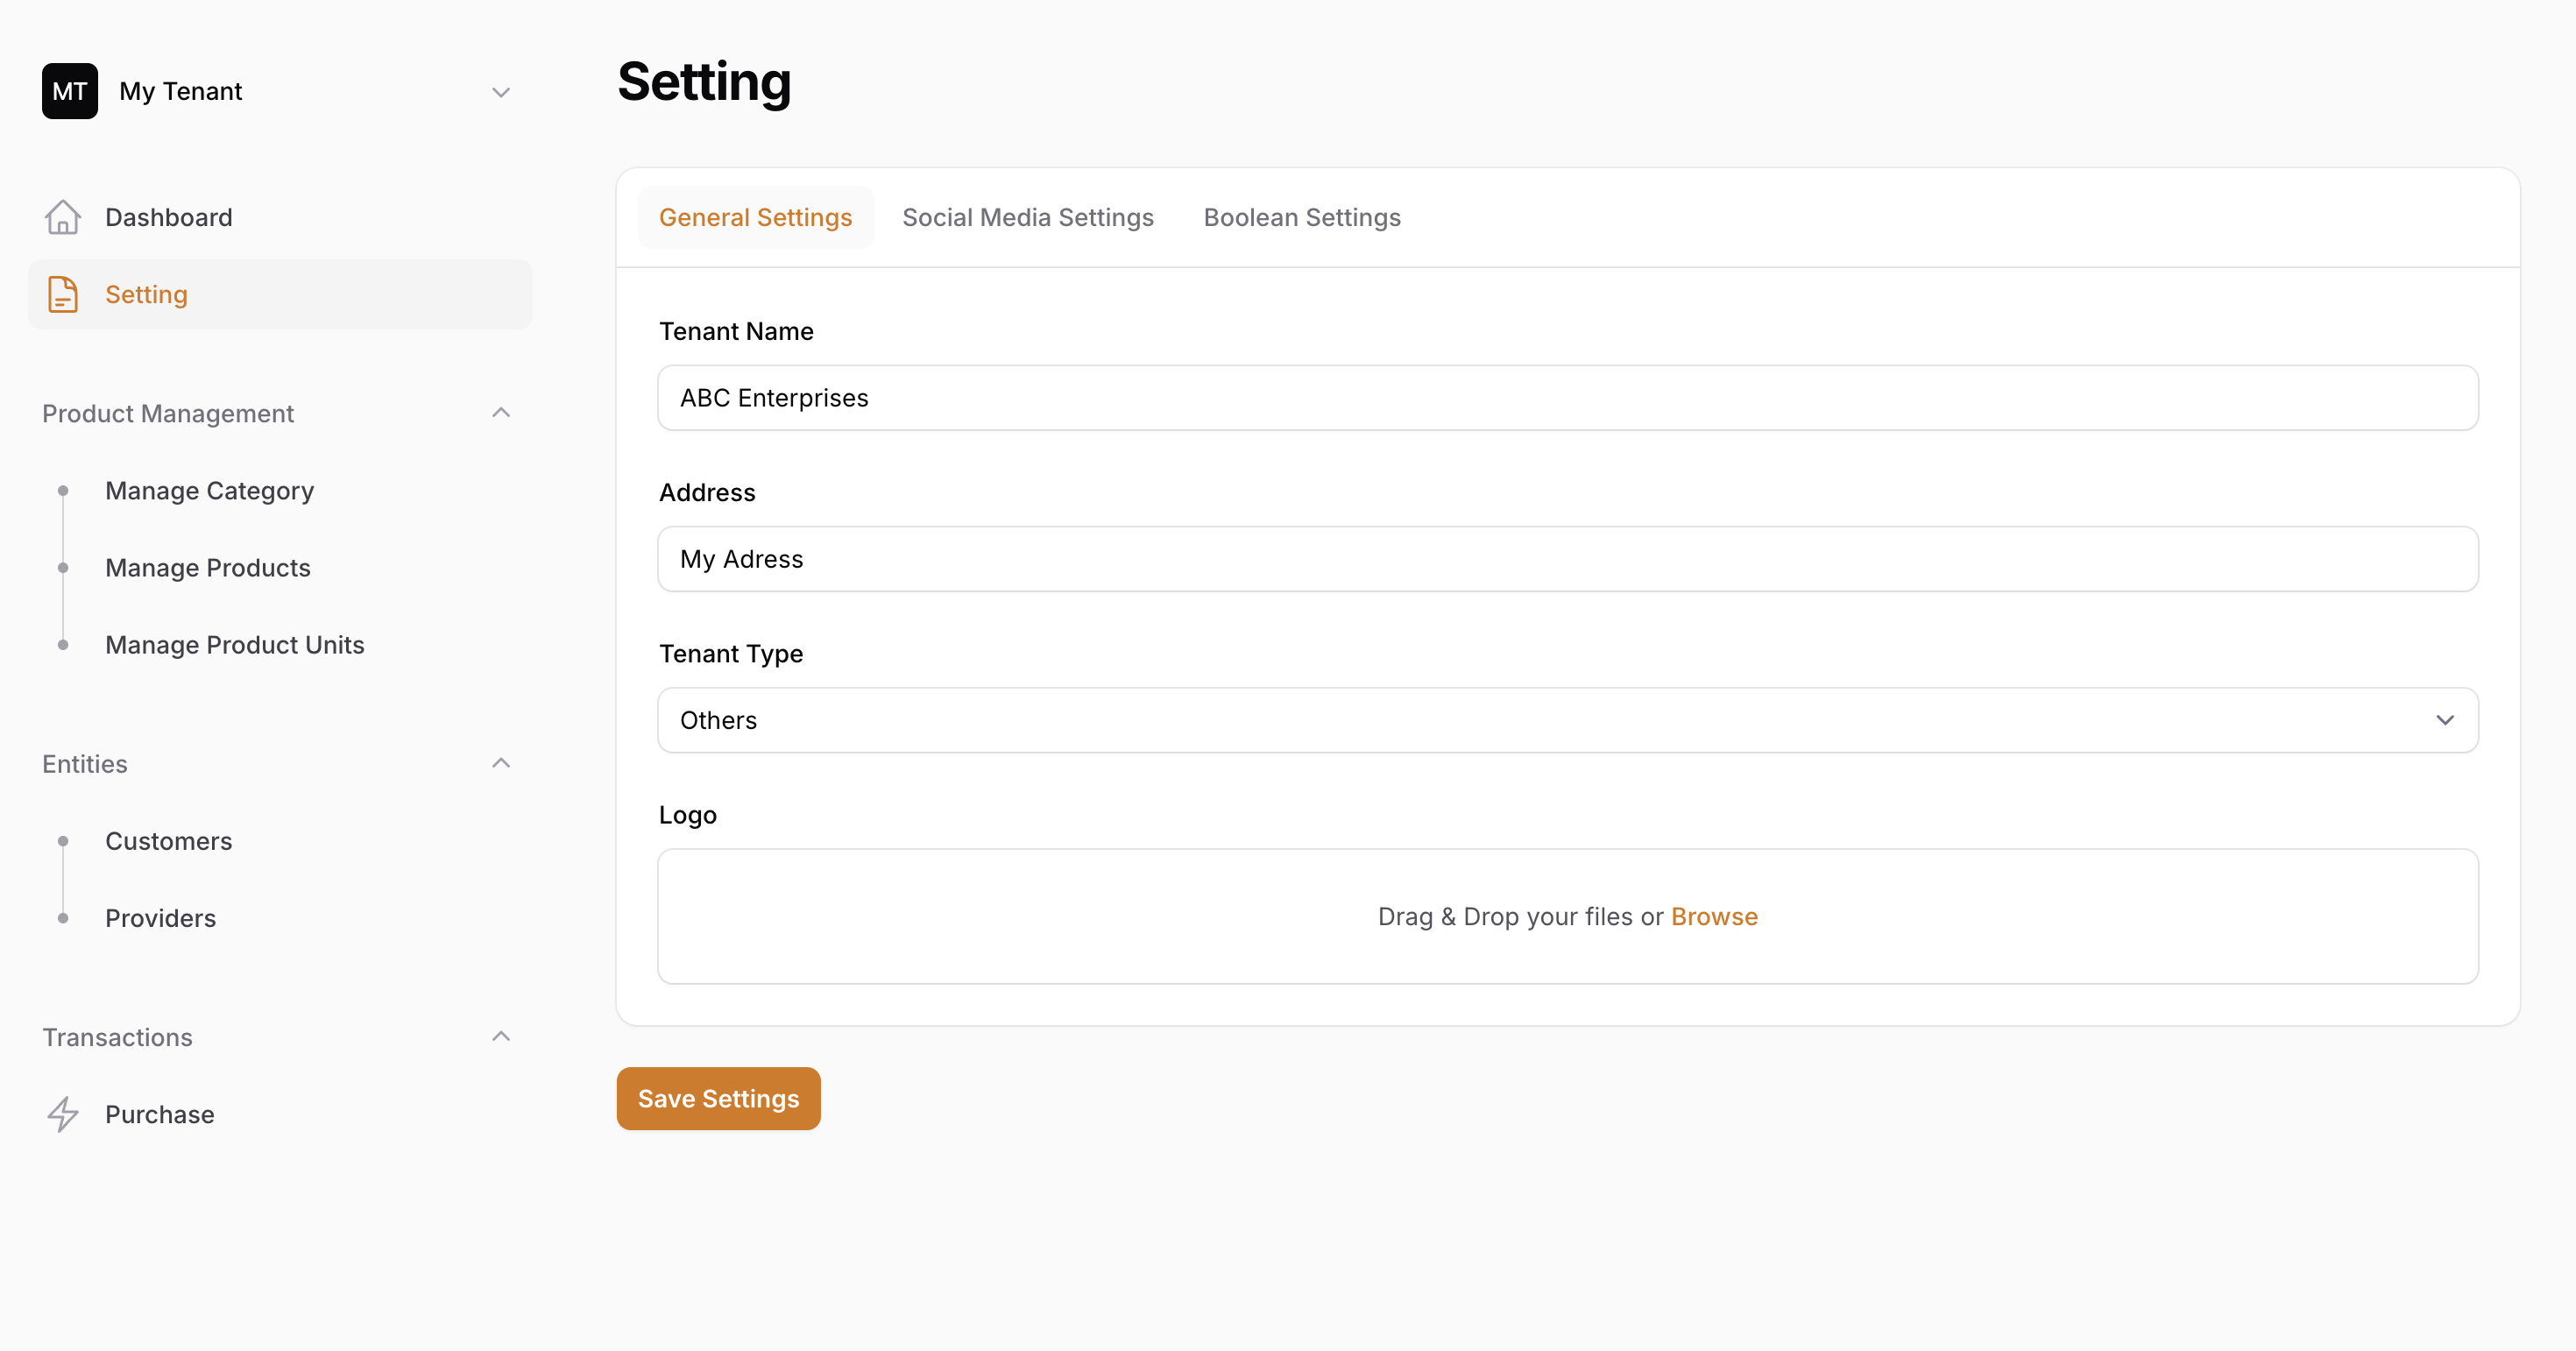
Dynamic Multi-Tenant settings Page in Filament : A Step-by-Step Guide. The following tutorial should provide you with a flexible, scalable solution.
In multi-tenancy, handling the settings of web applications is very tricky. Filament is a Laravel admin panel package that makes handling global settings for admins and tenant-specific settings very easy. In this article, you will learn how to make a multi-tenant settings page in filament dynamic where an admin can define the global configurations while tenants will be able to customize their settings.
The following tutorial should provide you with a flexible, scalable solution to handling settings within multi-tenant applications.
Remember, we have two panels : first for managing admin (Panel Name: Tenant Manager) and second panel is of tenants (Panel Name: Admin). Lets start to create settings Page in Filament.
Check out the filament official documentation.
Step 1: Creating a model and migration file on main admin panel.
First, lets create a Settings model and migration file on our system. For that, hit the following command:
php artisan make:model Setting -mThe command above will generate model and migration file for us. Lets add columns on our migration file.
public function up(): void
    {
        Schema::create('settings', function (Blueprint $table) {
            $table->id();
            $table->string("key")->unique();
            $table->text('value')->nullable();
            $table->string('group')->nullable();
            $table->json("attributes")->nullable();
            $table->string('type')->default("text");
            $table->timestamps();
        });
    }
We have created key , value, group, attributes and types column in our database. Key is to store the settings key name like name, address . Group will store the name such that we can group settings together in a tenant panel. Attributes key is to store extra information for any fields like options for select field. Type will store the field type name like text input, select, boolean etc.
After creating the above file run the migration by hitting the command below in your terminal.
php artisan migrateAlso, after that modify your settings model as following:
class Settings extends Model
{
    protected $fillable =[
        'key',
        "value",
        "type",
        "attributes",
        "group"
    ];
    protected $casts =[
        "attributes" =>"array"
    ];
}
Step 2: Creating a filament resource on main admin panel.
Now, its our turn to create a filament resource file. So for that please copy and paste the following command in your terminal.
php artisan make:filament-resource Settings --admin–admin means — your-panel-name
The above command will generate the SettingResource. Now, inside the SettingsResource Form method, copy the following code.
public static function form(Form $form): Form
    {
        return $form
            ->schema([
                Forms\Components\Section::make()
                    ->schema([
                        Forms\Components\TextInput::make("key")
                            ->label(__("key"))
                            ->required()
                            ->unique(ignoreRecord:true),

                        Forms\Components\Select::make("type")
                            ->label(__("Field Type"))
                            ->searchable()
                            ->options([
                                "text" => "Text Input",
                                "boolean" =>"Boolean",
                                "select" => "Select",
                                "file" => "File"
                            ])
                            ->reactive(),

                        Forms\Components\TextInput::make("group")
                            ->label(__("Group"))
                            ->datalist(Settings::pluck('group')->toArray()),

                        Forms\Components\Repeater::make("attributes.options")
                            ->label(__("default.Options"))
                            ->grid(2)
                            ->simple(
                                Forms\Components\TextInput::make('key')
                                    ->required(),
                            )
                            ->visible(function(Callable $get){
                                return $get('type')== "select";
                            })
                    ])
            ]);
    }
So, the above code will generate us the form. We had made type as reactive because on the basis of type select we are showing the value of attributes options.
After that , lets modify our table columns too.
....
return $table
->columns([
                Tables\Columns\TextColumn::make("key")
                    ->label(__("Key"))
                    ->searchable()
                    ->sortable(),

                Tables\Columns\TextColumn::make("type")
                    ->label(__("Type"))
                    ->searchable()
                    ->sortable(),

                Tables\Columns\TextColumn::make("group")
                    ->label(__("Group"))
                    ->searchable()
                    ->sortable()
            ])
.......
So, now the work of our main tenant is completed. Here, now we can add as much as settings we want.Now lets goto our tenant panel.
Step 3: Create a model and migration for TenantSettings
Here, we will create a tenant settings model and migration . So, open your terminal and follow the steps below:
php artisan make:model TenantSetting -mNow, it will generate Tenant Setting model as well as migration. So, lets first update our migration file:
public function up(): void
    {
        Schema::create('tenant_settings', function (Blueprint $table) {
            $table->id();
            $table->foreignId("tenant_id");
            $table->foreignId('setting_id');
            $table->text("value")->nullable();
            $table->json('data')->nullable();
            $table->timestamps();
        });
    }
Now, lets update our model:
class TenantSetting extends Model
{
    protected $guarded =[];
    protected $casts =[
        "data" => "array"
    ];

// relation to settings.
    public function setting()
    {
        return $this->belongsTo(Setting::class);
    }

// relation to tenant.
    public function tenant()
    {
        return $this->belongsTo(Tenant::class);
    }
}
Also, we need to create a relation tenant settings on our Tenant model for tenant specific data.
 public function settings()
    {
        return $this->hasMany(TenantSetting::class);
    }
Step:4 Create a setting page and register it
Now, in this step, we are going to create a settings page instead of resource. The reason behind this is we just need a simple edit page. So, to create that add the following command in your terminal.
php artisan make:filament-pages SettingAfter entering the information, you’ll be prompted to provide the panel name. The resource name is optional and can be left out.
<?php

namespace App\Filament\Pages;

use Filament\Pages\Page;

class Setting extends Page
{
    protected static ?string $navigationIcon = 'heroicon-o-document-text';

    protected static string $view = 'filament.pages.setting';
}
We need to register the page, for that go to your panel provider and inside the Pages section add your page.
.....
            ->pages([
                Pages\Dashboard::class,
                Setting::class
            ])
....
Thats it, now you can see the page on your panel.
Step 4: Dynamic Multi-Tenant settings Page in Filament
Here we need to follow different steps:
- Since, a form is needed on our page, we need implement HasForms Contract and use the InteractsWithForms Trait.
......
class Setting extends Page implements HasForms
{
    use InteractsWithForms;
......
2. Lets create a variable data which will store the form data.
public ?array $data = [];3. Since, Filament page is a livewire component, we can use mount() method to get the settings from our admin panel, and our current settings and group them on the basis of group column.
public function mount(): void
    {
        // Get the current tenant
        $tenant = Filament::getTenant();

      // first lets get all the settings key from admin panel.
        $settings = Settings::all()
            ->groupBy('group')
            ->map(function ($items) {
                return $items->pluck('value', 'key');
            })
            ->toArray();

// fetch all tenant specific setttings.
        $tenantSettings = TenantSetting::where('tenant_id', $tenant->id)->get()->keyBy('setting_id');

        $mergedSettings = [];
// merge them.
        foreach ($settings as $group => $items) {
            foreach ($items as $key => $value) {
                $setting = Settings::where('key', $key)->first();

                $tenantSetting = $tenantSettings->get($setting->id);

                if ($tenantSetting) {
                    $mergedSettings[$group][$key] = $tenantSetting->value;
                } else {
                    $mergedSettings[$group][$key] = $value;
                }
            }
        }
// this will fill our form with our merged data.
        $this->form->fill($mergedSettings);
    }
4. Lets create a tab form for our page. Since, we will be using dynamic tabs, we need to create a dynamic form.
 public function form(Form $form): Form
    {
        return $form
            ->schema([
                Tabs::make('Settings')
                    ->tabs($this->generateTabs())
            ])
            ->statePath('data');
    }
In the above form method, we have used $this->generateTabs() method, that will generate the fields and tabs dynamically.
5. Lets define the generateTabs method:
protected function generateTabs(): array
    {
        $settings = Settings::all()->groupBy('group');

        return $settings->map(function (Collection $moduleSettings, string $module) {
            return Tab::make($module)
                    ->label(str($module)->title()->replace('_', ' '))
                    ->schema(
                        $moduleSettings->map(function ($setting) {
                            return $this->generateField($setting);
                        })->toArray()
                    );
        })->toArray();
    }
So, now we will have tabs as per our groups and for each tab schema we are using $this->generateField($setting) method. This method will get the dynamic form fields on the basis of setting field type.
6. Lets create dynamic fields for settings Page in Filament
public function generateField($setting)
    {
        $label = str($setting->key)->title()->replace("_"," ");
        $name = "{$setting->group}.{$setting->key}";
        return match ($setting->type) {
            'text' => TextInput::make($name)
                        ->label($label),

            'boolean' => Toggle::make($name)
                        ->label($label),

            'select' =>Select::make($name)
                        ->label($label)
                        ->options(function()use($setting){
                            return $setting->attributes['options'];
                        }),

            "file" =>FileUpload::make($name)
                        ->label($label),

            default => TextInput::make($name)
                ->label($label)
        };
    }
Here, on the basis of key we are creating the label and name for our fields and we are returning the fields on the basis of matched field types.
7. Lets add a save() method.
   public function save(): void
    {
        $tenantId = Filament::getTenant()->id;
        foreach ($this->form->getState() as $group) {
            if (is_array($group)) {
                foreach ($group as $key => $value) {
                    $settings[$key] = $value;
                }
            }
        }
        foreach ($settings as $key => $value) {
            $setting = Settings::where('key',$key)->first();
            if($setting)
            {
                TenantSetting::updateOrCreate([
                    "setting_id" => $setting->id,
                    "tenant_id" => $tenantId
                ],[
                    "value"=>$value
                ]);
            }

        }

         Notification::make()
         ->title('Settings saved successfully')
         ->success()
        ->send();
    }
Now the above method will update or create the settings on the basis of setting_id and tenant_id and sends notification to the user.
8. Modify blade template.
For everything to work, we need to change the blade file. The blade template is on your Page as:
protected static string $view = 'filament.pages.setting';Here we need to inform that page to add the form and save button. It can be done by adding the following code:
<x-filament-panels::page>
<form wire:submit="save">
        {{ $this->form }}

        <div class="mt-6">
            <x-filament::button type="submit">
                Save Settings
            </x-filament::button>
        </div>
    </form>
</x-filament-panels::page>
So, in this way we can create the dynamic settings page in filament. There are several ways, it might be complex since i am trying to create a completely dynamic form. If you have any queries or confusion regarding this, you can comment down below.
Click here to read more articles.
[…] the previous article, we created a multi-tenant settings functionality. Now, in this article, we will use those settings […]