In this article, we explore how we can setup multi-tenancy in filament. This is a complete lesson where we will start from creating a new laravel project to setup multi tenancy in filament and also setup some of the useful pacakges in our filament application.
Create Laravel Project
First, we will create a fresh laravel project, you can use the following command:
laravel new your-project-nameInstall filament
Now, after we setup a fresh laravel project, its time to install filament in our project. for that you can use the following command:
composer require filament/filament:"^4.0"

php artisan filament:install --panels
The above command will create one admin panel too.
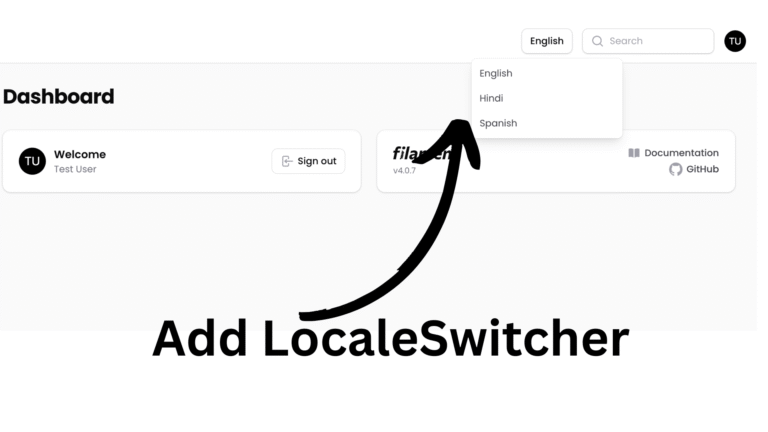
Now, switch to localhost:8000/admin/login.
Create a filament user
Now, we have access to our filament panel. Lets create an user who can access that panel. To create it , we can directly use the command:
php artisan make:filament-userAbove command will prompt for name, email and password. You can enter details and login to the admin panel where you can see Dashboard page.
Usecases
To make it easier, in this video, we will create two panels: admin and app where in admin panel, we will use the functionality to CRUD tenant and its user where app panel will be used for tenant.
ADMIN PANEL
Create a Tenant Model and Migration
First, we will start with tenant model. You can use the code below to create a tenant model.
php artisan make:model Tenant -mYou can specify the name on the basis of your need like Team, Tenant etc..
Migration for Tenant
Lets complete the migration for the tenant database.
  Schema::create('tenants', function (Blueprint $table) {
            $table->id();
            $table->string('name');
            $table->text('description')->nullable();
            $table->timestamps();
        });
You can extend this and use columns as per your need. Lets run the migration.
php artisan migrateAlso, in our Tenant model, lets add:
<?php

namespace App\Models;

use Illuminate\Database\Eloquent\Model;

class Tenant extends Model
{
    protected $fillable =['name','description'];
}
Create Filament Resource
After that we will create a filament resource on our admin panel.
php artisan make:filament-resource Tenant
- What is the title attribute for this model? : This column is used in breadcrumb. So, you can enter columns that you want to show or you can leave it empty. For now, I will use “name” as title attribute.
- Would you like to generate a read-only view page for the resource? : If you would like to generate the view page then click Yes else No. For now, I don’t want view page in tenant resource.
- Should the configuration be generated from the current database columns?: You can click Yes as it will auto generate fields for us on the basis of our database columns.
Folder Structure Explanation
Now, our Tenant Resource is created. Lets view the file structure.
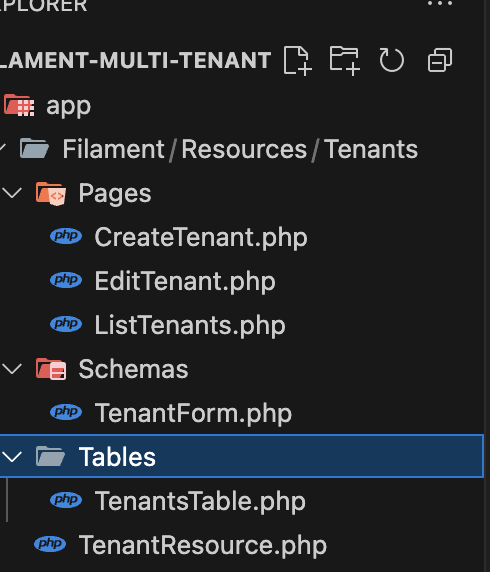
You can see there, inside our Resources, we have a Resource name directory Tenants.
1. Pages Directory
- Pages/CreateTenant: In this page, we can write the logic to override any default action when creating a record. For eg: extra validation, or modifying data when saving.
- Pages/EditTenant: Similarly to create tenant page, this page is used to control when we are editing the data.
- Pages/ListTenant: This is our main index page, In this page we can use tabs control and much more.
Most of the actions are handled by filament directly. So, we only use those pages if we need any advance control.
2. Schemas
- TenantsForm: In this page, we configure our form components. In simple words, we add our fields in this page and that form is load when we are creating or editing records.
3. Tables
- TenantsTable: As the name specified, we will add our table columns that we want to display in index page table list here. Moreover, we can create filters, actions, bulk actions. So, in simple words, everything related to table is configured in this class.
4. Tenant Resource
This is the main resource class, lets discuss about it in detail.
Explaining Resource in details
1. Defining model
First thing we do is to define the model in our resource. This is handled by default. You can also create a resource that uses external records like API, instead of displaying the records saved in database. You can check it our here.
2. Defining Icon
Now, for icon, Heroicons are used by default. You can alternatively use your own components too. To use the icon, we can use the $navigationIcon property .
use BackedEnum;

    protected static string|BackedEnum|null $navigationIcon = Heroicon::BuildingOffice;

OR
use BackedEnum;
use Illuminate\Contracts\Support\Htmlable;

public static function getNavigationIcon(): string | BackedEnum | Htmlable | null
{
    return Heroicon::BuildingOffice;
}
You can also assign separate icon when the menu is active.
protected static string | BackedEnum | null $activeNavigationIcon =Heroicon::BuildingOffice;
Adding Form Components
Lets quickly setup our Tenant form components.
<?php

namespace App\Filament\Resources\Tenants\Schemas;

use Filament\Forms\Components\Textarea;
use Filament\Forms\Components\TextInput;
use Filament\Schemas\Schema;

class TenantForm
{
    public static function configure(Schema $schema): Schema
    {
        return $schema
            ->components([
                TextInput::make('name')
                    ->required(),

                Textarea::make('description')
                    ->nullable()
            ]);
    }
}
Adding Table Components
<?php

namespace App\Filament\Resources\Tenants\Tables;

use Filament\Actions\BulkActionGroup;
use Filament\Actions\DeleteBulkAction;
use Filament\Actions\EditAction;
use Filament\Forms\Components\RichEditor\TextColor;
use Filament\Support\Enums\FontWeight;
use Filament\Tables\Columns\TextColumn;
use Filament\Tables\Table;

class TenantsTable
{
    public static function configure(Table $table): Table
    {
        return $table
            ->columns([
                TextColumn::make('name')
                    ->searchable()
                    ->weight(FontWeight::Bold),

                TextColumn::make('description')
                    ->limit(10)
            ])
            ->filters([
                //
            ])
            ->recordActions([
                EditAction::make(),
            ])
            ->toolbarActions([
                BulkActionGroup::make([
                    DeleteBulkAction::make(),
                ]),
            ]);
    }
}
NOTE: THIS ARTICLE IS INCOMPLETE.