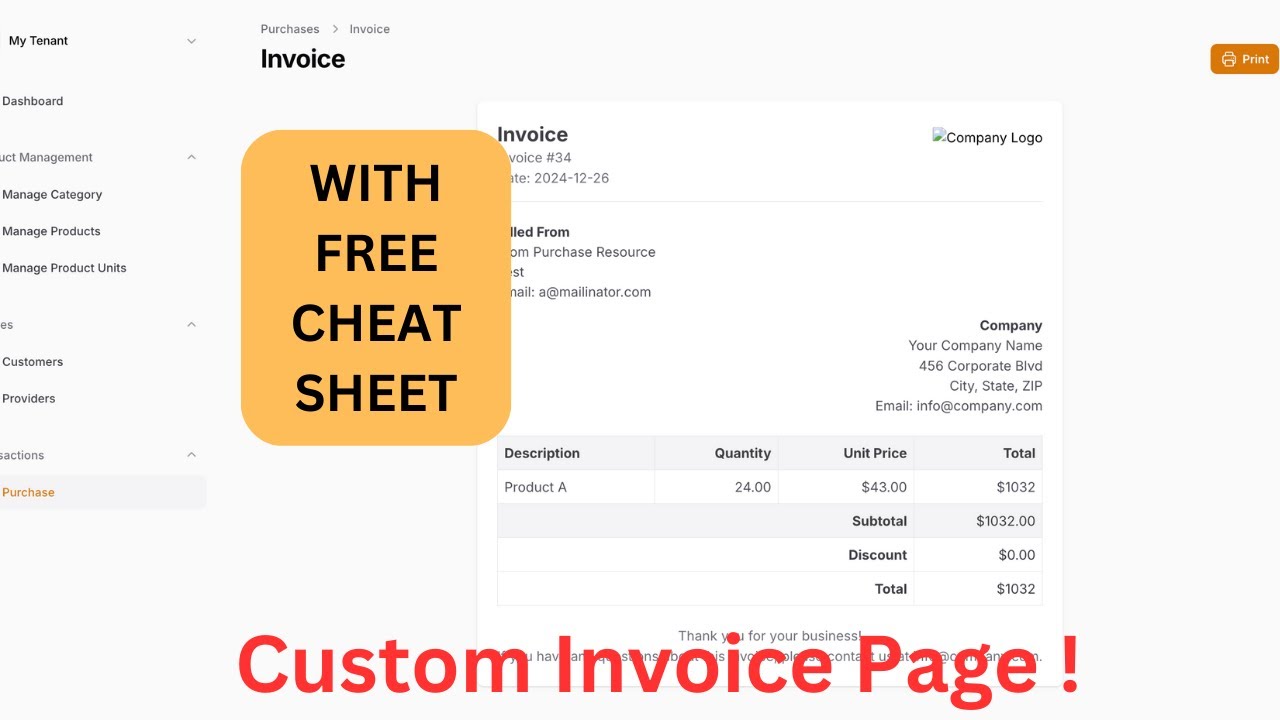
In this article, we are going to explore invoice creation with Laravel filament Admin Panel. We are going to utilize the filament custom page.
If you want to learn by video. Check this video :
Note: All the data and code are on the basis of above video playlist. So, don’t forget to watch it.Click here to explore the playlist.
Create a custom page
First of all, we will create a custom page. For that , just use the following command :
php artisan filament:page InvoiceNote: the above command will ask for the resource. If you want resource specific page, then you need to enter the resource name. For me it was the purhcase resource.
The below is the boilerplate of our custom page with its own blade file.
.....
class Invoice extends Page
{
    protected static string $resource = PurchaseResource::class;
    protected static string $view = 'filament.resources.purchase-resource.pages.invoice';
...
And, the code for the view page is:
<x-filament-panels::page>
</x-filament-panels::page>
Register the page in filament resource
Now, after we created an invoice page. We first need to add that page to our resources. For that, we just need to add the new url on the getPages() method as below:
 public static function getPages(): array
    {
        return [
              ....
            'invoice' => Pages\Invoice::route('/{record}/invoice') // this line
        ];
    }
Now, our new invoice page can be opened in url purchase_id/invoice format. {record} means the id of the purchase for now.Its an unique identifier.
Create action to open the invoice page
In addition, now we are going to create a table action on our Purchase Resource labelled as Invoice that will open our custom invoice page.
public function table(){
.....
Tables\Actions\Action::make('view_invoice')
                    ->label(__("View Invoice"))
                    ->url(function($record){
                       return self::getUrl('invoice',['record'=>$record]);
                    })
...
}
Here, inside the table method of our resource , inside actions() array , we just add a new action class. and the url() method, that will return the url of our invoice.
If you are new on creating Action on filament, you can check out this video:
Now, whenever we click on the action button, we are redirected to our custom page.
Working on Custom Livewire Page
Since, every filament pages are the livewire component, we can use the mount() method, which runs when the component is first initiated. So, whenever the page is first initialized, we will utilize this method to get the get the purchase id so we can proceed for our further works.
 public $record;
    public $purchase;
    public $settings;

    public function mount($record)
    {
        $this->record = $record;
        $this->purchase = Purchase::with(['provider','products'])->find($record);
    }
Here, if you check the above code, i created 3 variables $record, $purchase , $settings , record will get the id, purchase will store the information of purchase, products as well as the provider details. We can use those details in our blade file for invoice creation with Laravel Filament.
Modify Blade File
Now the last step is to create a normal blade file and add that between <x-filament-panels::page> tags.
So, for the from bill part meaning filament settings part. Please check this article.
Here is the code:
<head>
    <title>Purchase From {{$purchase->provider?->name}}</title>
</head>
<div style="background-color: white; box-shadow: 0 1px 3px rgba(0,0,0,0.1); padding: 24px; max-width: 800px; margin: 0 auto;">
    <!-- Header -->
    <table style="width: 100%; border-bottom: 1px solid #e5e7eb; padding-bottom: 16px;">
        <tr>
            <td>
                <h1 style="font-size: 24px; font-weight: bold; color: #4a5568;">Invoice</h1>
                <p style="color: #a0aec0;">Invoice #{{ $purchase->invoice_no }}</p>
                <p style="color: #a0aec0;">Date: {{ $purchase->purchase_date }}</p>
            </td>
            <td style="text-align: right;">
                <img src="/path-to-your-logo.png" alt="Company Logo" style="height: 64px;">
            </td>
        </tr>
    </table>

    <!-- Billing Information -->
    <table style="width: 100%; margin-top: 24px;">
        <tr>
            <td>
                <h2 style="font-weight: bold; color: #4a5568;">Billed From</h2>
                <p style="color: #718096;">{{ $purchase->provider?->name }}</p>
                <p style="color: #718096;">{{ $purchase->provider?->address }}</p>
                <p style="color: #718096;">Email: {{ $purchase->provider?->email }}</p>
            </td>
            <td style="text-align: right;">
                <h2 style="font-weight: bold; color: #4a5568;">Company</h2>
                <p style="color: #718096;">Current Company</p>
                <p style="color: #718096;">Current Address</p>
                <p style="color: #718096;">Current Zipcode</p>
                <p style="color: #718096;">Email: Current Email</p>
            </td>
        </tr>
    </table>

    <!-- Invoice Items -->
    <table style="width: 100%; margin-top: 24px; border-collapse: collapse; border: 1px solid #e2e8f0;">
        <thead>
            <tr style="background-color: #f7fafc;">
                <th style="border: 1px solid #e2e8f0; padding: 8px; text-align: left; color: #4a5568;">Description</th>
                <th style="border: 1px solid #e2e8f0; padding: 8px; text-align: right; color: #4a5568;">Quantity</th>
                <th style="border: 1px solid #e2e8f0; padding: 8px; text-align: right; color: #4a5568;">Unit Price</th>
                <th style="border: 1px solid #e2e8f0; padding: 8px; text-align: right; color: #4a5568;">Total</th>
            </tr>
        </thead>
        <tbody>
            @foreach($purchase->products as $product)
            <tr>
                <td style="border: 1px solid #e2e8f0; padding: 8px; color: #718096;">{{ $product->product->name }}</td>
                <td style="border: 1px solid #e2e8f0; padding: 8px; text-align: right; color: #718096;">{{ $product->quantity }}</td>
                <td style="border: 1px solid #e2e8f0; padding: 8px; text-align: right; color: #718096;">${{ $product->price }}</td>
                <td style="border: 1px solid #e2e8f0; padding: 8px; text-align: right; color: #718096;">${{ $product->quantity * $product->price }}</td>
            </tr>
            @endforeach
        </tbody>
        <tfoot>
            <tr style="background-color: #f7fafc;">
                <td colspan="3" style="border: 1px solid #e2e8f0; padding: 8px; text-align: right; font-weight: bold; color: #4a5568;">Subtotal</td>
                <td style="border: 1px solid #e2e8f0; padding: 8px; text-align: right; color: #4a5568;">${{ $purchase->total }}</td>
            </tr>
            <tr>
                <td colspan="3" style="border: 1px solid #e2e8f0; padding: 8px; text-align: right; font-weight: bold; color: #4a5568;">Discount</td>
                <td style="border: 1px solid #e2e8f0; padding: 8px; text-align: right; color: #4a5568;">${{ $purchase->discount }}</td>
            </tr>
            <tr>
                <td colspan="3" style="border: 1px solid #e2e8f0; padding: 8px; text-align: right; font-weight: bold; color: #4a5568;">Total</td>
                <td style="border: 1px solid #e2e8f0; padding: 8px; text-align: right; color: #4a5568;">${{ $purchase->total - $purchase->discount }}</td>
            </tr>
        </tfoot>
    </table>

    <!-- Footer -->
    <div style="margin-top: 24px; text-align: center; color: #a0aec0;">
        <p>Thank you for your business!</p>
        <p>If you have any questions about this invoice, please contact us at info@company.com.</p>
    </div>
</div>
The above is the normal blade file, that will generate the invoice format.
Conclusion
So, in this way we can utilize the filament custom page to create our required invoice page. If you have any confusion, you can comment down below.